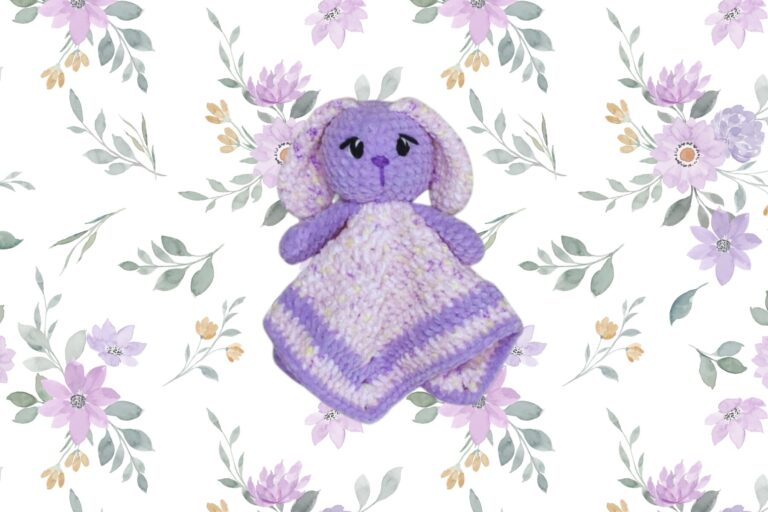
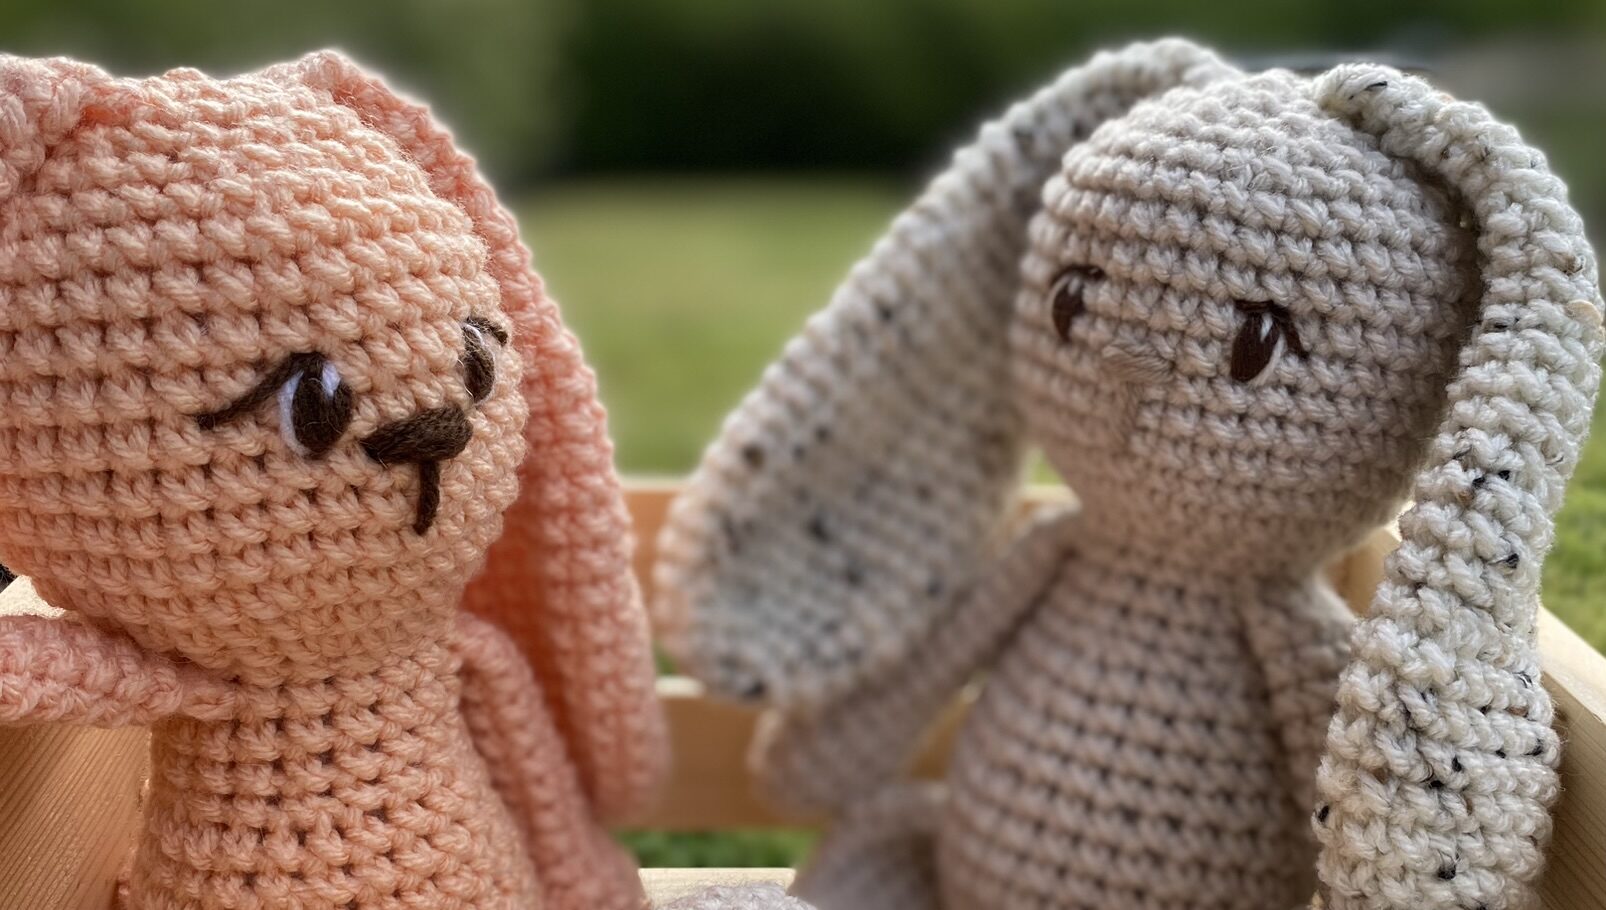
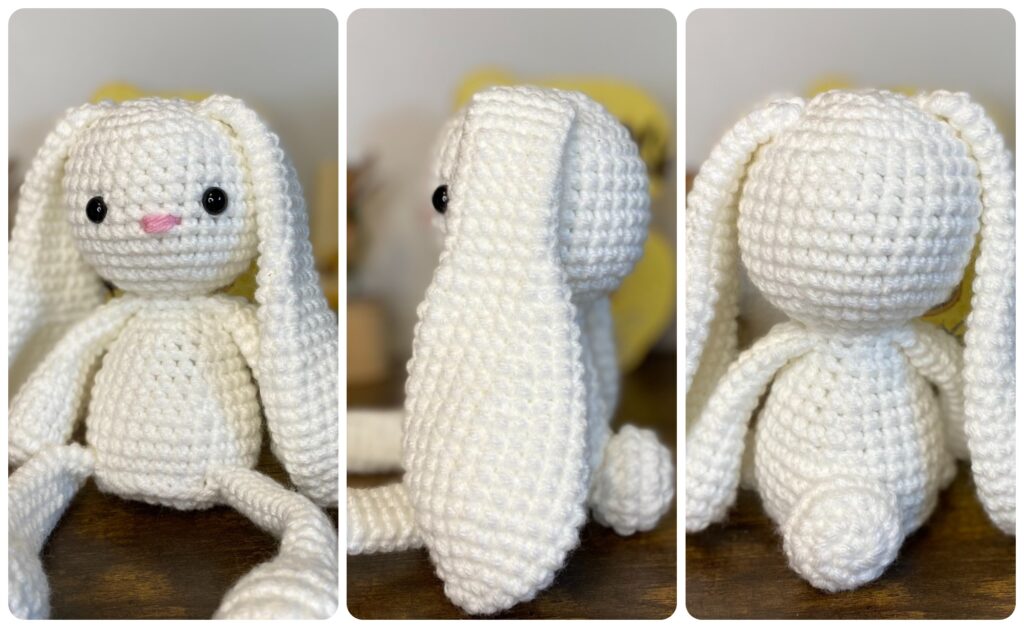
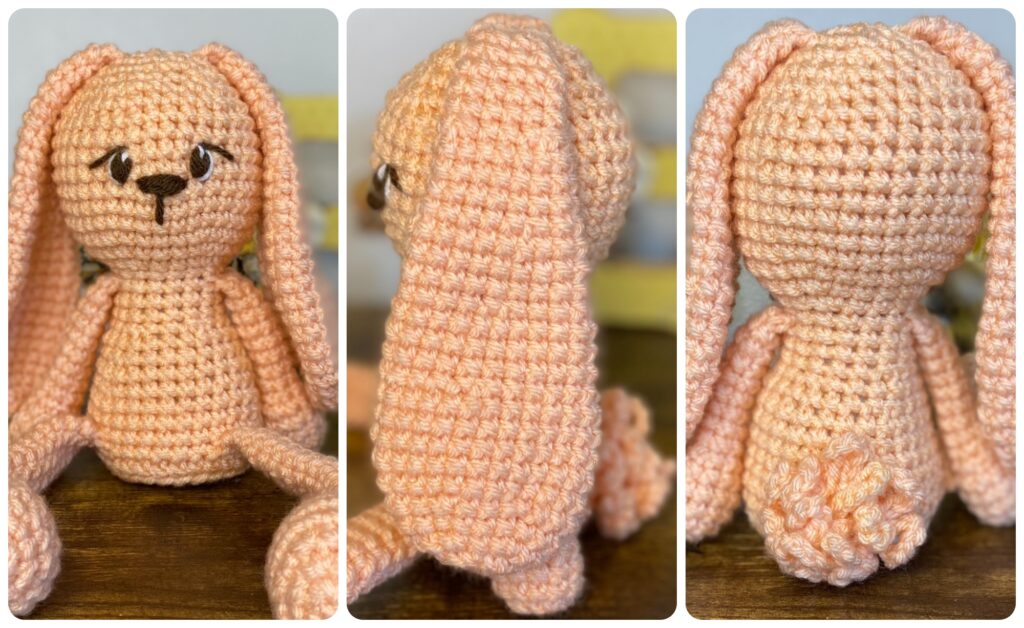
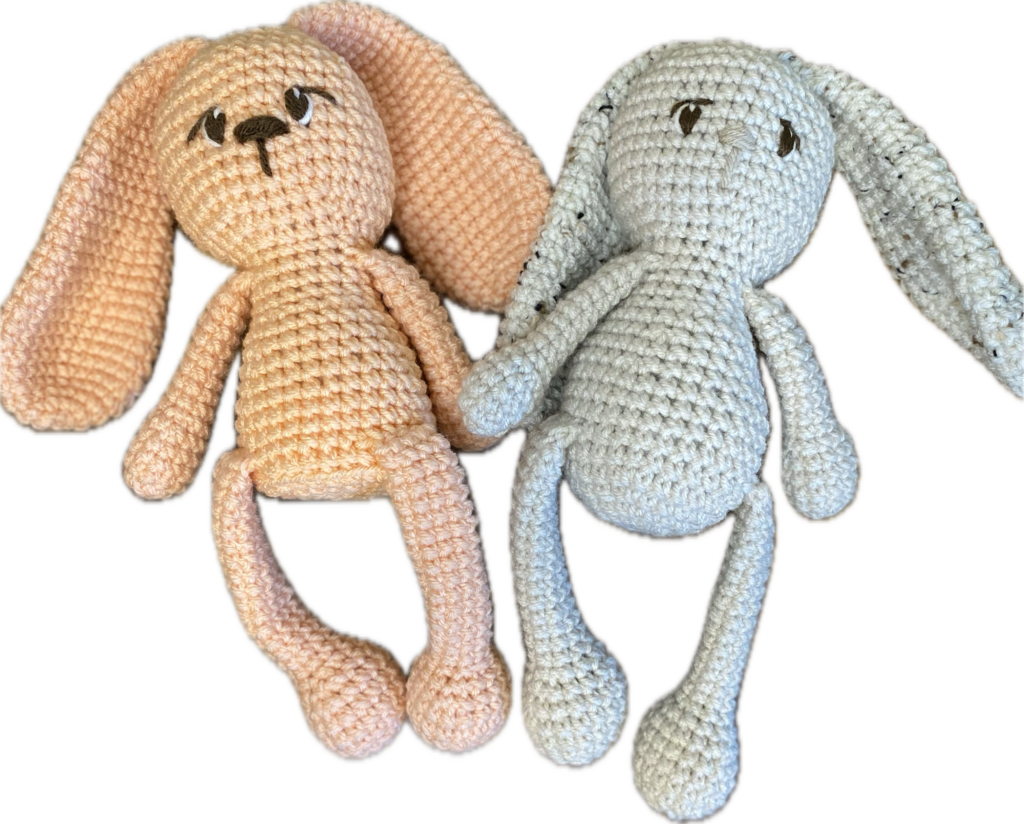
LopZ the Lop Eared Bunny: a FREE crochet pattern
Bunnies, bunnies, bunnies… they are EVERYWHERE in my house right now because I have been crocheting them a lot lately. I am so excited to share this pattern with you all. This free pattern was originally published as a shelf sitter on my old blog. While designing FlopZ the Chubby Bunny, I found some things that would make this pattern better as well as making it a plushie! This new modified design is what I am sharing here on this post. Introducing: LopZ, the Lop Eared Bunny: a free bunny crochet pattern!

This little lop eared bunny shelf sitter would make the perfect decoration for a nursery or bedroom. Additionally, it can also be used as baby shower decor or as an Easter/Spring decoration. It can be made as a shelf sitter which means it has a flat bottom and is weighted where it can sit. Either on the edge of a shelf with it’s legs hanging off or sitting on a flat surface, it adds a touch of whimsy to any space. Regardless of where you place it (perched on a bookshelf, nestled among stuffed animals, or sitting on a dresser) this adorable bunny will to bring a cheerful feeling to any room.
Or it would make the perfect plushie for a baby gift or nestled inside an Easter basket.
The differences between the first pattern and this revised one
There are 3 changes I made with this revised pattern:
- The neck is bigger
- The ears are better proportioned
- The tail is changed from a ball to a loopy tail
AND… I also wrote instructions where this bunny can easily be make into a plushie instead of a shelf sitter.
About this free pattern
(UPDATE 4/27/2024: This pattern has been revised again since first publishing this post. This revision staggers the INCs and DECs so that the slanted lines are eliminated.)
- The Shelf Sitter is weighted with Poly Pellets so that it will sit without falling over. However, this is optional. You can use stuffing only. Additionally, I do NOT recommend using anything except Poly Pellets for weights, especially when making it for a child.
- Use all one color, or use a different color for the ears and tail. Try a variegated, ombre, or tweed yarn for the ears and tail for a cute, unique look!
- This free bunny crochet pattern is for the advanced beginner with amigurumi knowledge. It is worked completely in the round and the body is crocheted together in one piece. It is LOW SEW!! The only sewing is the tail and facial features.
- Yarn colors are noted in the pattern according to the parts listed in the supplies in BOLD letters.
- I use the “yarn under” method for all my amigurumi for a tighter look. Be sure to use a stitch marker and counter to keep up with your rounds.
Helpful Videos
There are two playlists on my YouTube channel that might be helpful in making this pattern:
This pattern was designed and written by me: the WhimZ B and is protected by copyright and cannot be sold or reproduced by any means. You are NOT allowed to share this pattern, but you ARE allowed to share the link to this website. MY photos are not allowed to be shared, but you ARE allowed to share photos of YOUR completed project. Video tutorials of this free pattern are NOT allowed. Selling finished items is permitted and encouraged. Please give credit for the pattern to me when sharing your creations on social media.
Supplies
- Hook: F (3.75mm)
- Yarn: 4-Medium weight in main Body color, Nose and (optional) Eyes and Ears/Tail
- Stuffing
- (For Shelf Sitter ONLY) Poly Pellets and a sock or stocking to put them in
- (For Shelf Sitter ONLY) Plastic Canvas (small 3×3” piece)
- Optional: 12mm Plastic Safety Eyes
- Yarn needle
- Stitch Marker
Terms/Abbreviations
- MR: Magic Ring
- INC: Increase
- SC: single crochet
- DEC: decrease (Use the invisible decrease)
- CH: chain
- SLST: slip stitch
- ST(S): stitch(es}
- R/ RND(S): round(s)
- BLO: back loop only
- SLST: slip stitch
Arms
Make 2
R1: With Body, MR 6 SC (6)
R2: INC around (12)
R3-5: SC around (3 rnds of 12)
R6: *SCx 4, DEC* around (10)
R7: *SCx 3, DEC* around (8)
Lightly stuff hands only.
R8-15: SC around (8 rnds of 8)
Pinch together and SC across (4). CH1 and tie off leaving a 3-4” tail.
Legs
Make 2
R1: With Body, MR 6 SC (6)
R2: INC around (12)
R3: *SC, INC *around (18)
R4-6: SC around (3 rnds of 18)
R7: *SCx4, DEC* around (15)
R8: *SCx3, DEC* around (12)
R9: *SCx2, DEC* around (9)
Stuff feet only (Do not overstuff).
R10-23: SC around (14 rnds of 9)
R24: DEC, SCx7 (8)
R25: Pinch together and SC across (4). CH1 and tie off leaving a 4” tail.
Ears
Make 2
R1: With Body or Ears/Tail, MR 6SC (6)
R2: INC around (12)
R3: *SC, INC* around (18)
R4: SC around (18)
R5: SC, INC, (SCx2, INC)x5, SC (24)
R6-10: SC around (5 rnds of 24)
R11: SCx3, DEC, (SCx6, DEC)x2, SCx3 (21)
R12-14: SC around (3 rnds of 21)
R15: *SCx5, DEC* around (18)
R16-18: SC around (3 rnds of 18)
R19: SCx2, DEC, (SCx4, DEC)x2, SCx2 (15)
R20-22: SC around (3 rnds of 15)
R23: *SCx3, DEC* around (12)
R24-26: SC around (3 rnds of 12)
R27: SC, DEC, (SCx2,DEC)x2, SC (9)
R28: SC around (9)
R29: DEC, SCx7 (8)
R30: Pinch together and SC across. CH1 and tie off leaving a 3” tail (4)
Tail
R1: With Body or Ears/Tail, MR 6SC. Join with a SLST (6)
R2: CH9. Working in the back loops of R1: SC in next st, CH9 repeat *– * around. (6 loops)
R3: CH9. Working in the front loops of R1: SC in next st, CH9 repeat *– * around, ending with a SC in the last st. (6 more loops)
Pull MR closed. Cut a long tail and tie to the MR tail in multiple knots.
Body
[Shelf Sitter body]
R1: With Body, leaving a 3-4” tail, MR 10 SC (10)
R2: *SC, INC* around (15)
R3: SC, INC, (SCx2, INC)x4, SC (20)
R4: *SCx3, INC* around (25)
R5: Loosen tension. SCx2, INC, (SCx4, INC)x6, SCx2 (30)
R6: SC around in BLO (30)
Follow instructions for shelf sitter, except:
R5: you do not need to loosen tension
R6: will NOT be in the BLO.
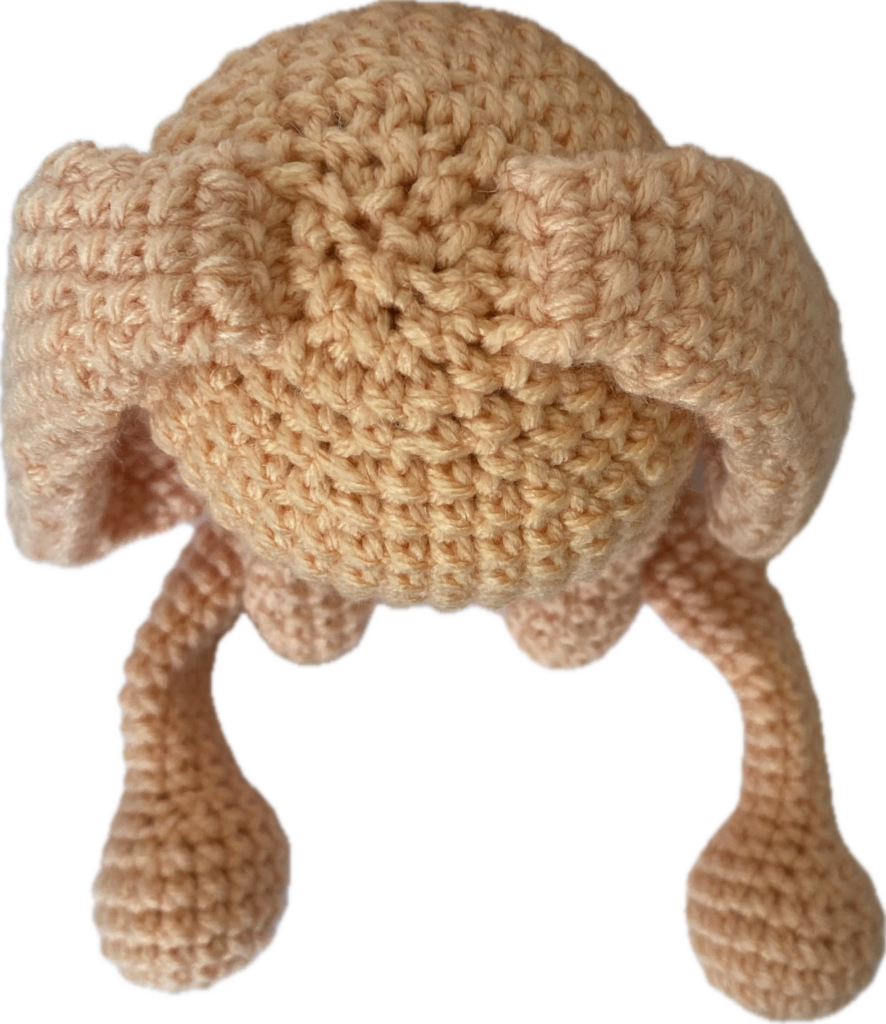
Attach Legs
R7: SCx8, SCx4 (attaching leg by crocheting through R25 of the leg and onto the body,) SCx6, SCx4 (attaching leg,) SCx8 (30)
TIP: the legs have a bit of curve to them, make sure they are curving the same direction towards the front.
R8-10: SC around (3 rnds of 30)
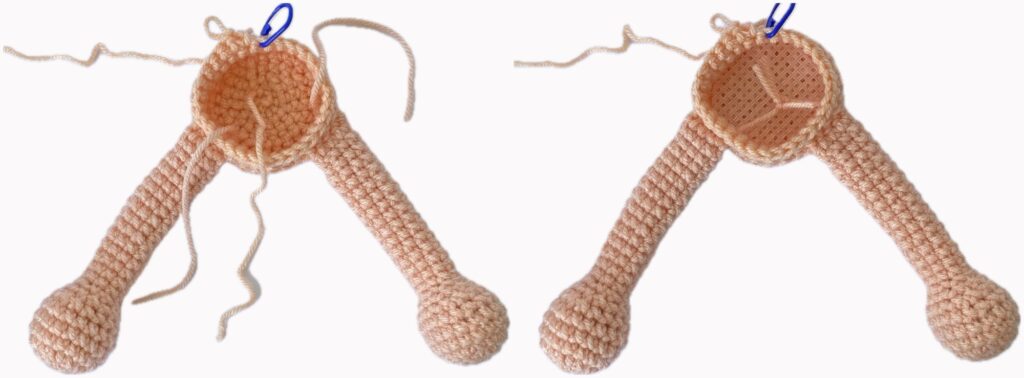
Cut a circle out of your plastic canvas to fit in the base of the bunny and lay inside. Pull tail from MR up through the plastic canvas and the tails from the legs inside the body and tie together. Be careful not to pull them in too tight as to distort the body. Tie ends in multiple double knots to help secure.
Continue with body
R11: SCx4, DEC, (SCx8, DEC)x2, SCx4 (27)
R12: SC around (27)
Fill a sock or stocking with Poly Pellets (enough to fill the bottom of base).
Tie off and stuff inside the base, making sure your knot is on the top. Make sure to push this down as you add the stuffing.
OR use stuffing only.
Stuff the rest of the body as you go.
R13: *SCx7, DEC* around (24)
R14: SC around (24)
R15: SC, DEC, (SCx2, DEC)x5 , SC (18)
R16-17: SC around (2 rnds of 18)
R18: SC around, crocheting on arms so they will hang behind the legs. There should be 5sts between each arm on both sides. (18)
Mine worked out as follows: SCx4, SCx4(attaching arm), SCx5, SCx4(attaching arm), SC.
TIP: the arms have a bit of curve to them, make sure they are curving the same direction towards the front.
R19: SC around (18)
Stuff body up to this point.
Pull tails from arms inside the body and tie together. Be careful not to pull them in too tight as to distort the body. Tie ends in multiple double knots to help secure.
Head
R20: SC, INC, (SCx2, INC)x5 , SC (24)
R21: *SCx3, INC* around (30)
R22: SCx2, INC, (SCx4, INC)x5, SCx2 (36)
R23-30: SC around (8 rnds of 36)
If using safety eyes, add them between R25-R26, 5 visible stitches apart.
R31: SCx2, DEC, (SCx4, DEC)x5 , SCx2 (30)
Make sure to stuff the neck and head firmly but do not overstuff.
R32: *SCx3, DEC* around (24)
R33: SC, DEC, (SCx2, DEC)x5, SC (18)
R34: SC around, crocheting on the ears where they will hang from the center on each side with 5 STS between each ear.
Mine worked out as follows: SCx5, SCx4 (attaching ear), SCx5, SCx4 (attaching ear) (18) Pull tails from ears inside the head and tie together. Be careful not to pull them in too tight as to distort the head. Tie ends in multiple double knots to help secure.
Add more stuffing to the head. Make sure to squish it around as you stuff to give it a good shape and remember to not overstuff!
R35: DEC around. (9)
Cut a tail and using a needle, weave it through the front loops of R35. Pull tight to close. Tie off and weave through the top of head a few times. Trim.
Attach Tail
Thread the longer tail of the bunny tail through your needle and attach to the back center of the body at R6-9.

Embroidered Eyes
If you would like to embroider eyes, I do have some helpful videos on my YouTube channel in this playlist: Shelf Sitters
Nose
Cut a length of Nose and thread through needle. Insert into the center of the head right above the neck. Exit at the center pin in R25 . Insert 2 rounds directly below. Exit at R25 1 st over from your center mark. Make approx. sts to form nose crossing 2 or 3 sts . Take needle back through the stuffing and exit where you first entered. Tie ends together. Thread both ends into your needle and pull through the head to exit out of the back of the head. Pull yarn taut and trim.
and there’s more…
If you would like a printable PDF with photos and written instructions on embroidered eyes, please visit my Etsy shop (linked below) to purchase this pattern at a low price!
If you make a LopZ Bunny, then please tag me on social media! I would love to see your creation. If you have enjoyed this free bunny crochet pattern, please follow me on social media for more free patterns and to be notified of any new patterns that are in my Etsy shop!