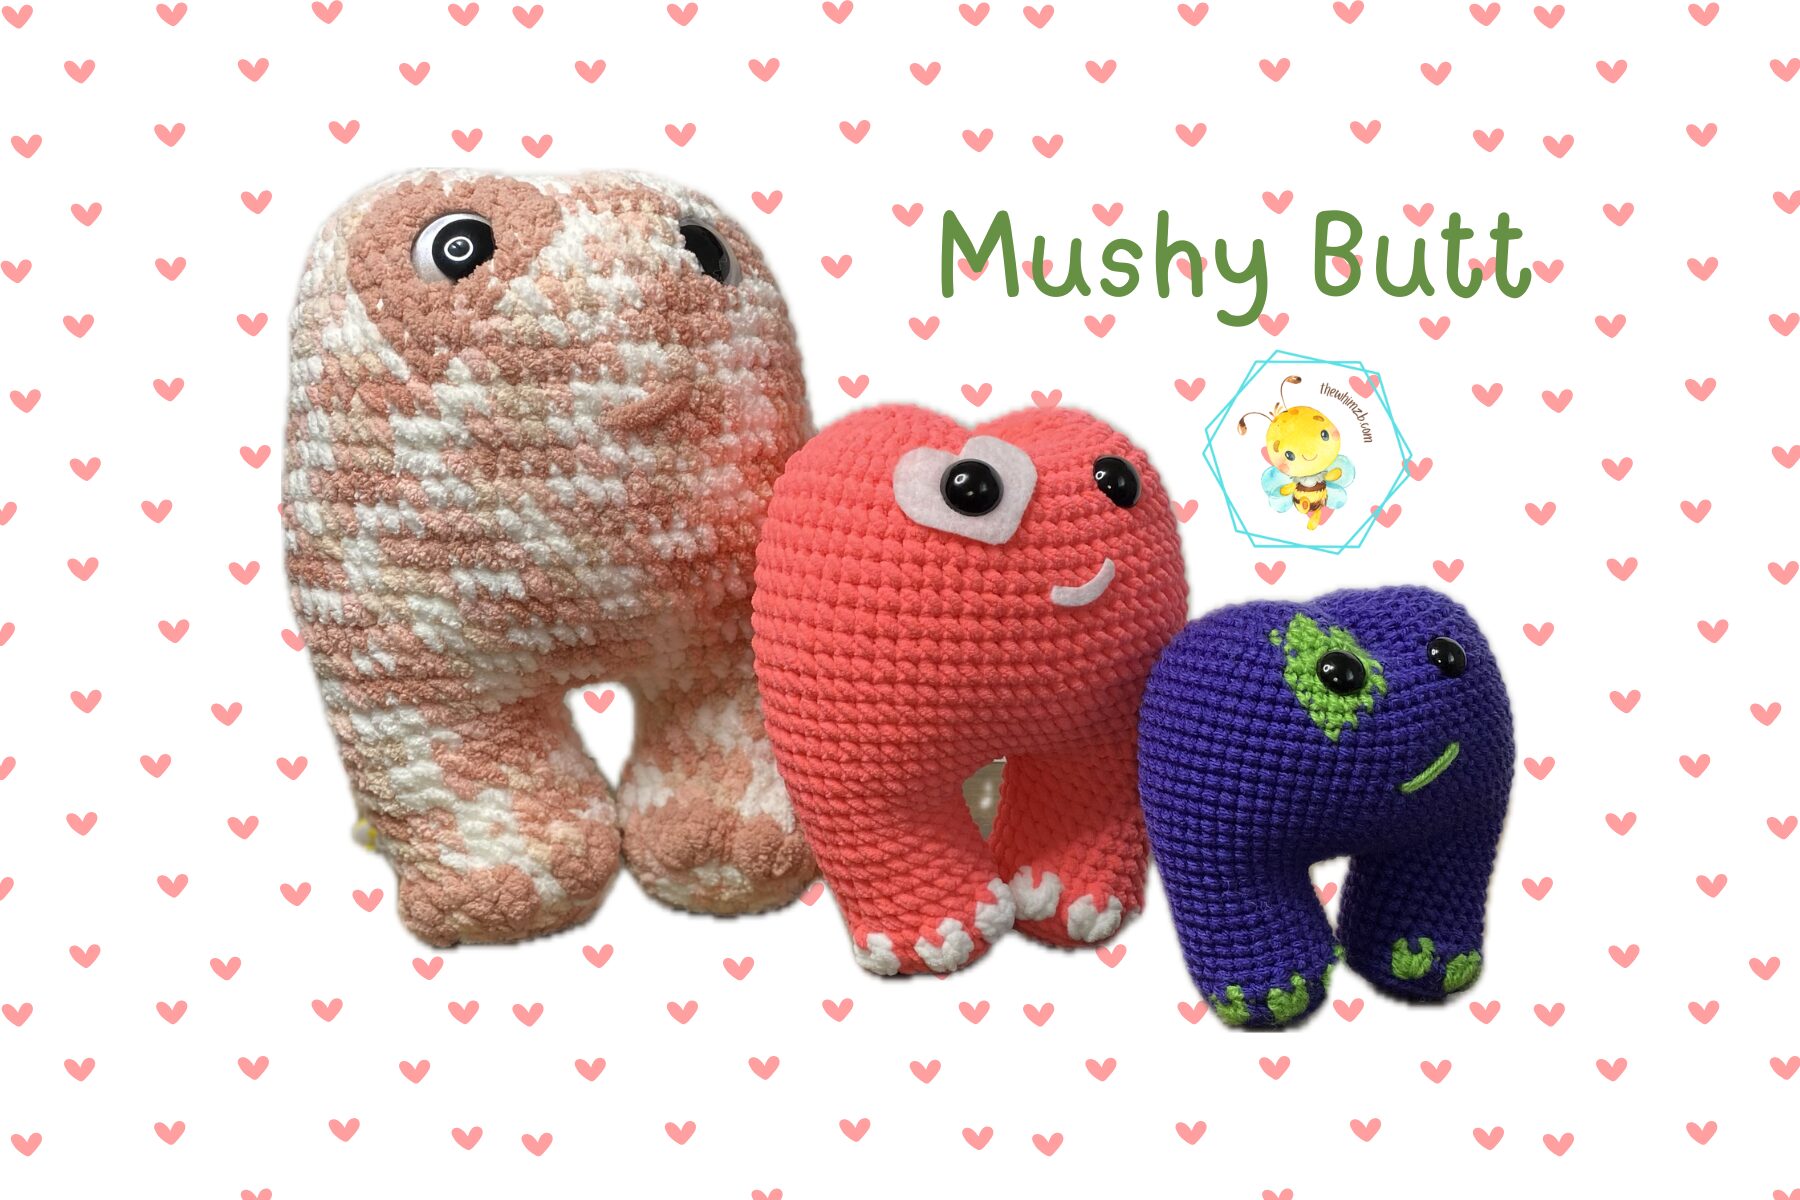
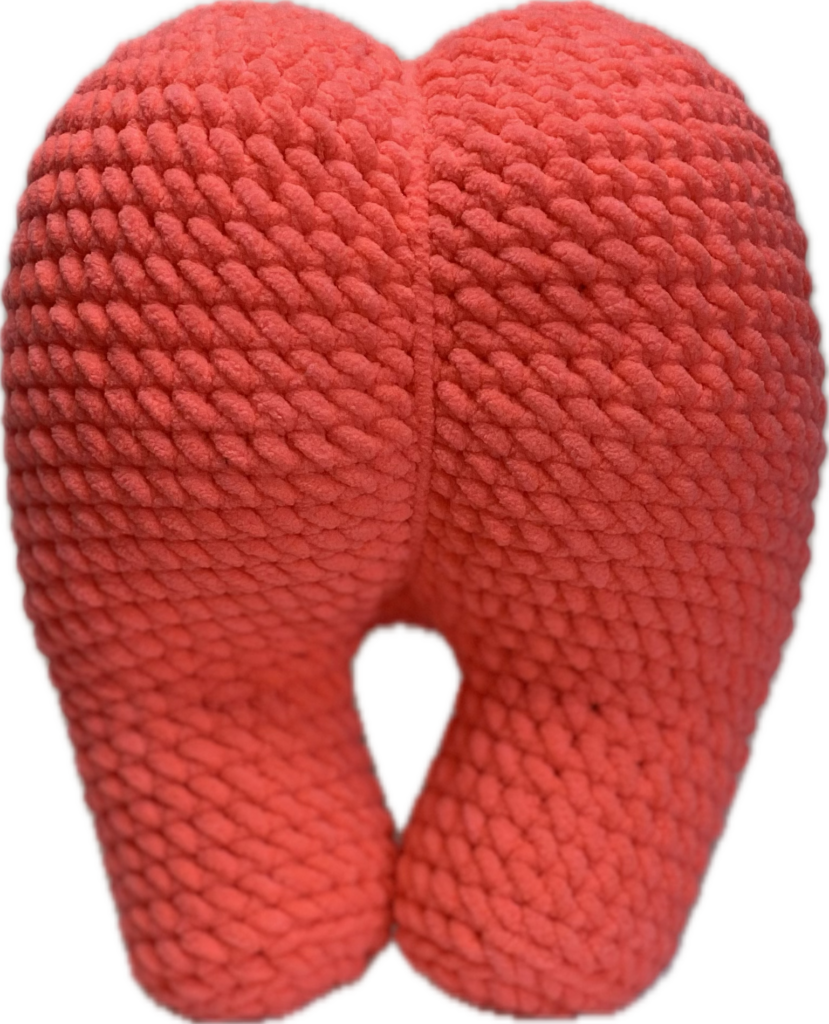
Free Valentine’s Crochet Pattern: Mushy Butt
Looking for a hilariously cute and totally unique project? This free Valentine’s crochet pattern is just what you need! Meet Mushy Butt—the perfect squeeze! This adorable little creature has heart shaped toes, a cute heart shaped eye patch and a squishy, heart-shaped body that makes it impossible to resist. Whether you’re making a quirky gift for your sweetheart or just want a fun new project, this beginner-friendly crochet pattern is a must-try. Plus, I’ve included step-by-step YouTube video links to guide you through any tricky parts. Best of all? It’s free! Grab your hook, and let’s get stitching!
About this Pattern
This pattern includes instructions for a simple felt heart under the eye as well as directions for how to crochet a heart eye patch into the body.
You can use any yarn with this pattern. If you use thick blanket yarn, please be aware that the safety eyes will be a lot harder to attach and it is very difficult to form the “butt”.
Please read each section of the pattern before starting.
Pattern is NO SEW and is worked in the round using single crochet stitches unless otherwise instructed.
Use a stitch marker to mark the first stitch of each round.
I recommend using the “Yarn Under” method.
The Magic Ring can be very tricky when using plush yarns. I personally use the “chain 2” method.
Supplies
- Yarn: Use any yarn/weight in colors for
- “Body“
- “Secondary” for toes
- Acrylic or Cotton Yarn that matches “Body”- about 24-36″
- Hook: Use a hook size to match the yarn you choose
- A small piece of felt for heart behind eye and a mouth
- Tacky Glue
- Basic amigurumi supplies plus a LONG yarn needle
- Safety eyes Bigger eyes look best for this project!
Terms and Abbreviations
- BLO: back loop only
- CC: color change
- CH: chain
- DEC: invisible decrease
- FLO: front loop only
- FO: fasten off
- INC: increase
- MR: magic ring
- R or RND(s): row(s) or round(s)
- SC: single crochet
- ST(s): stitch(es)
- YO: yarn over
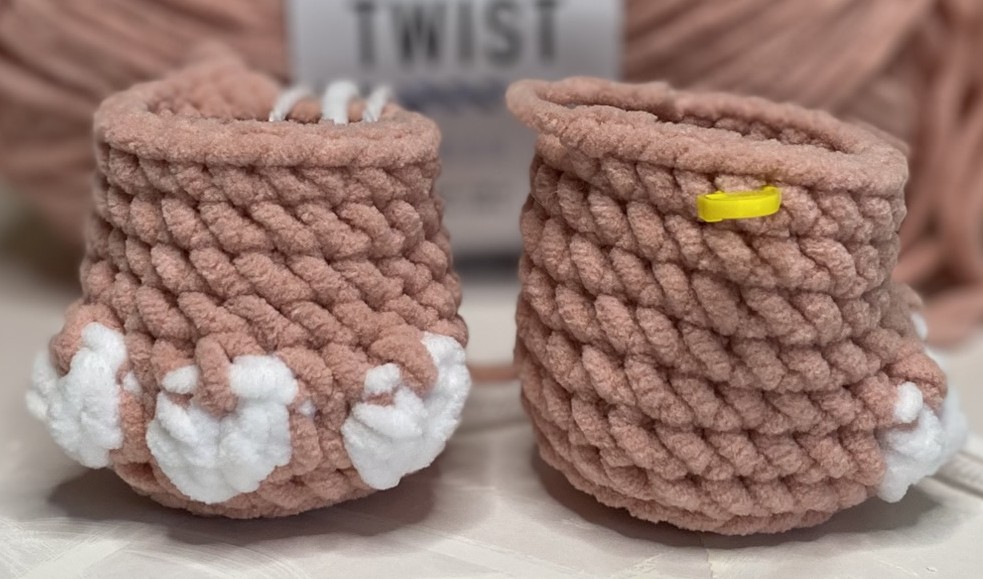
To create the heart shaped toes: CC to “Secondary”. Into one st work: 2DC bobble st, ch1, 2DC bobble st. CC to “Body”. Don’t forget to do your CC in the last pull-through of the second bobble.
Insert hook into back loops of both bobbles (skipping the ch1). YO and pull through both loops (2 loops on hook.) Insert hook into the ch1 space between the bobbles. YO and pull through the space (3 loops on hook.) YO and pull though all 3 loops.
Color Change (CC)
When you are at the last “pull through” of the stitch before the color change, switch to the new color and pull that color through to complete that stitch. Then you have your new color on the hook ready for the next stitch.
Feet/Legs
Make 2
- R1: With “Body”, MR 8 SC (8)
- R2: INC around (16)
- R3: (SC, INC)x8 (24)
- R4: In BLO, SC around (24)
- R5: SCx8, Toe, SCx2, Toe, SCx2, Toe, SCx9 (24)
- FO “Secondary”
- R6: SCx8, MDEC, SCx2, MDEC, SCx2, MDEC, SCx9 (24)
- R7-10: SC around (4 rnds of 24)
- FO the first leg (with a short tail), but not the second. On the first leg, mark the middle inside st of the leg. Mine was the 5th st back from last st.
Body
- R11: SCx5. You should be at the middle of the side of the foot. Ch5. Attach to the marked st of the second foot with a SC. SC around the second leg. SC in the FLO of the 5 chains. SC around the first leg (58)
- R12: SCx5, SCx5 in the BLO of chains, SCx48 (58)
- R13: SCx7, INC, SCx28, INC, SCx21 (60)
- R14: SCx4, INC, SCx5, INC, SCx24, INC, SCx5, INC, SCx18 (64)
- Stuff the feet well. If using blanket yarn, wait to stuff.
- If you want to crochet the heart patch over the eye, scroll down to next section.
- R15-29: SC around (15 rnds of 64)
- R30: SCx3, DEC, (SCx6, DEC)x7, SCx3 (56)
- R31: (SCx5, DEC)x8 (48)
- R32: SCx2, DEC, (SCx4, DEC)x7, SCx2 (40)
- R33: (SCx3, DEC)x8 (32)
- Start stuffing the body and stuff as you go
- R34: SC, DEC, (SCx2, DEC)x7, SC (24)
- Insert eyes between R28-29, 8 visible sts apart. It will be easier to mark them first without the heart on the eye.
- R35: (SC, DEC)x8 (16)
- R36: DEC around (8)
- Close hole by cutting a long tail and using a needle to weave through the FLO of R36. Pull tight to close and weave to secure. Hide end.
Body with Heart Eye Patch
CCs to “Secondary” are in BOLD. Be sure to make CCs as directed in the Terms Section. Since you will be inserting a safety eye into the patch, do not carry your yarns as you make CCs. Instead, you will need to trim at each CC. Then you can just tie the ends together in double knots.
- R15-24: SC around (10 rnds of 64)
- R25: SCx48, SC, SCx15 (64)
- R26: SCx47, SCx3, SCx14 (64)
- R27: SCx46, SCx5, SCx13 (64)
- R28: SCx45, SCx7, SCx12 (64)
- R29: SCx44, SCx9, SCx11 (64)
- R30: SCx3, DEC, (SCx6, DEC)x4, SCx6, DEC, SCx6, DEC, SCx6,
- DEC, SCx3 (56)
- R31: (SCx5, DEC)x5, SCx4, SC, (not invisible)DEC, SC, SCx2, SCx2,
- DEC, SCx5, DEC (48)
- R32: SCx2, DEC, (SCx4, DEC)x5, SC, SC, SCx2, DEC (first loop
- “body”, second loop “secondary”, finish in “body”), SCx4, DEC,
- SCx2(40)
- R33: (SCx3, DEC)x8 (32)
- Start stuffing the body and stuff as you go
- R34: SC, DEC, (SCx2, DEC)x7, SC (24)
- Insert eyes between R28-29, 8 visible sts apart.
- R35: (SC, DEC)x8 (16)
- R36: DEC around (8)
- Close hole by cutting a long tail and using a needle to weave through the FLO of R36. Pull tight to close and weave to secure. Hide end.
A HUGE thank you to Splinters N Yarn for offering to design this eye patch for Mushy Butt!!
Making the Butt
- Take your long length of acrylic or cotton yarn and thread it into your long needle.
- *Insert it at the very center between the legs (from the back) and exit on the opposite side (the front), in the center, above the eyes between R28-29. Pull the yarn through leaving a 3-4″ tail. Take the needle down the center of the back and insert again through the same place you entered the first time.*
- Make the same pass again (*-*), but this time insert needle 2 rnds above the bottom point and exit 1 rnd below. Pull both ends TIGHT to form the butt cheeks.
- Tie ends together in a double knot, trim and hide inside.
- If you didn’t DEC at the leg joins like I recommended in the video, before trimming the longest tail, use it to close the holes.
If you don’t have a coordinating yarn for this, make it with whatever you have, then use a piece of “body” to go over it and hide it.
Additional Options
Would you rather have a printable PDF or a better digital copy of this pattern? I have that very thing available in my Etsy Shop at a discounted price. This PDF is digitally interactive and you can click the links in the pattern to the corresponding YouTube video.
Your Mushy Butt is Finished!
I hope you love making your own Mushy Butt as much as I loved designing it! This free Valentine’s crochet pattern is the perfect quirky gift or fun addition to your handmade collection.
 Show Off Your Mushy Butt! Share your finished creations on social media and tag me—I’d love to see them! Happy crocheting!

Don’t forget to check out my other free crochet patterns on the blog for more fun projects.
Check out my other Valentine’s Day themed patterns
Check out my other FREE crochet patterns